Showing posts with label easy. Show all posts

Sunday, May 27, 2012

Vanishing Oatmeal Chocolate Chip Cookies

(This is a slight adaptation from the Quaker "vanishing oatmeal raisin cookie" recipe. I obviously used chocolate chips instead!)

Made these for my mom to take to work one day, I hear that they really were vanishing!

Ingredients:
  • 1/2 cup (1stick) plus 6 tbsp. butter, softened
  • 3/4 cup firmly packed brown sugar
  • 1/2 cup granulated sugar
  • 2 eggs
  • 1 tsp vanilla
  • 1 1/2 cups all-purpose flour
  • 1 tsp baking soda
  • 1 tsp ground cinnamon
  • 1/2 tsp salt (optional)
  • 3 cups Quaker Oats (quick or old fashioned, uncooked)
  • 1 cup chocolate chips (or raisins. Or nuts... whatever you prefer!)
Steps:
  1. Heat oven to 350 degrees. In large bowl, beat butter and sugars on medium speed of electric mixer until creamy.
  2. Add eggs and vanilla; beat well.
  3. Add combined flour, baking soda, cinnamon and salt; mix well.
  4. Add oats and chocolate chips (or other additives); mix well.
  5. Drop dough by rounded tablespoonfuls onto ungreased cookie sheets.
  6. Bake 8 to 10 minutes or until light golden brown. Cool 1 minute on cookie sheets; remove to wire rack. Cool completely. Store tightly covered.


Makes about 4 dozen cookies.
Bar Cookies: Bake 30 to 35 minutes in ungreased 13x9 inch metal baking pan.

As I said before, I used chocolate chips instead of raisins. partly because I like chocolate chips more and partly because we didn't have raisins. Also, I greased my baking sheet anyway, because you never know. 

Thursday, May 17, 2012

Crochet: ZigZag Blanket


Well my lovely crochet friends, I know it is very satisfying when you finish a big project, like an afghan or sweater. Sadly, I am not there yet with my zigzag blanket! But I thought I’d update all of you on my progress!
It all started last winter before I left for Vietnam. My friend Stephen and I were hanging out and I happened to look up some different crochet patterns on YouTube (I’m not the best at reading patterns, so video tutorials are my favorite at the moment). We found that the classic crochet zigzag blanket really isn’t too difficult to make, so we gave it a shot! While studying abroad, I found out that my dear friend had started his zigzag blanket journey by using this video tutorial.

It is a beautiful blanket thus far, and I was so jealous! I kept saying I was going to steal the blanket once he finished. I figured that that wouldn’t be a good idea (all that work just for me to steal it, LOL!) so I decided to start my journey and make my own. I couldn’t really follow the previous tutorial from the beginning, so I found a different video tutorial that works just as well.

At first I was thinking of making the pattern to look like a sunset. But then I realized it looked a lot like my mom’s Vera Bradley “buttercup” patterned purse. Alas, I pulled the old thing out, and it was pretty much dead on! For a couple of days I couldn’t believe it, and as I worked on my blanket, the only thing I saw was Vera. Well, I hadn’t seen the blanket in a few days because of finals and the end of semester craziness, and once I started working again, I grew to love it even more—forgetting (almost!) about the Vera lookalike. I shall keep you updated on my progress, so far it is HUGE, and I am so excited!

Sunday, May 13, 2012

Berry Trifle Dessert


Happy Mother’s Day to all you Mamas out there! 
For Mother’s Day here, my mom asked me to make this yummy looking berry trifle. (Let me just tell you, as a little aside, that she loves trifles like this, and it took us so long to find a trifle dish a few years ago! It was slim pickings, and now you can pretty much find them everywhere!) But anyway, she found this delicious recipe (see my changes below, after the recipe**), and it is delicious! No baking necessary, just preparation of already prepared foods. And it is GREAT for summer parties or just a hot day to treat yourself, enjoy!


Ingredients:
3 Tbsp. orange juice
1/4 tsp. almond extract
1 pkg. (10 oz.) prepared angel food cake, cut into 2-inch cubes
2 pkg. (1 oz. each) JELL-O Vanilla Flavor Fat Free Sugar Free Instant Pudding**
2-1/2 cups cold fat-free milk
1-1/2 cups thawed COOL WHIP Sugar Free Whipped Topping, divided
2 pkg. (12 oz. each) frozen unsweetened mixed berries (raspberries, blueberries, sliced strawberries), thawed, well drained**

Steps:
MIX juice and extract. Drizzle over cake cubes in large bowl; toss to coat.
BEAT pudding mixes and milk in medium bowl with whisk 2 min. Stir in 1 cup COOL WHIP.
RESERVE a few berries for garnish. Place half the cake cubes in 2-qt. glass bowl; top with layers of half each of the remaining berries and pudding mixture. Repeat layers. Refrigerate 2 hours. Top with remaining COOL WHIP and reserved berries just before serving.

**Since I forgot to get the vanilla pudding, we had a package of white chocolate sugar free pudding mix, so I used that and about 1.5 cups of milk (it gets a little thicker) to add to the cool whip and it was just as good. Also, Weis is currently remodeling and I had trouble finding frozen berries (Mom said later on that they are by the cool whip! Who knew?!), so I just used fresh strawberries, blueberries, blackberries, and raspberries. I was extremely shocked that the grocery store had already prepared angel food cake for sale, as that was convenient! Luckily this recipe is easily customizable, so pretty much following the bare-bones will lead you in the right direction.

Sunday, April 29, 2012

Crochet: Klutz Crcochet Flower


The flower that is in the Klutz Crocheting book is super easy and fun to make—it’s also really cute. The pattern is the second in the Klutz book and uses a variety of stitches. Happy crocheting!

Flower Pattern:
Chain 6 and join ends of the chain by pushing hook through the first stitch (create a circle)
Pick up the yarn and pull it through the hook to join the circle
Chain 3
Double crochet 14 into the center of the ring (not into the stitches/chains!)
Slip stitch into the chain 3 section once all DC’s are complete
Pick up yarn and pull it through the look, as before to join round
Chain 1
First half-petal: Half double crochet 1, 1 double crochet, 1 triple (treble) crochet into the next stitch
Second half-petal: In the next stitch, 1 triple crochet, 1 double crochet, 1 half double crochet (NOTE: there are 3 crochet stitches per each half petal)
Chain 1
Slip stitch into next stitch
Repeat half-petal steps around until there are 5 petals
Slip stitch into the last stitch when finished
Cut yarn and weave into flower

(Attach to a cute crochet piece, or attach a pin or bobby pin and turn it into a cute accessory!)


Thursday, April 26, 2012

Cake Decorating: How do I Cover a Cake with Fondant?


As you may know, I have wanted to be a baker for some time now. I have taken the Wilton classes and even the commercial baking class at the local community college. I strive to go to Johnson & Wales University in Rhode Island once I finish my degree at Fairleigh Dickinson University to get a degree in Baking & Pastry (I’ve already been accepted!). Recently, one of my yoga instructors had told me I should really try to start selling my cakes or get the word passed around (we all know that word of mouth advertising can be very beneficial). I took her advice and have had my first cake sale (and many since then!)! I must say that I was very pleased with the cake and how it turned out. So, since I was so pleased, I thought I would give you a few hints as to how to cover a cake with fondant (since I thought I did that pretty successfully this time).
          
This part can be the most stressful when decorating a cake because you never quite know how gravity will work and if the fondant will tear. Usually, if there is a tear or a problem area, that is where the back is or where the decorations go—it is funny how this is what is used to figure out the front and back of a cake!

             
You can find a video tutorial for covering cakes with fondant here: http://www.youtube.com/watch?v=vecmy4nKT-A
You can also read the Wilton tutorial: http://www.wilton.com/decorating/fondant/rolled-fondant.cfm

The Wilton way is slightly different than the demonstration in the video, so I will go into detail about that:
Note: Make sure that the frosting atop your cake is not fully crusted so that the fondant has something to stick to.

  1. Roll out fondant on “Fondant Fun” Wilton mat. Cover mat with vegetable shortening (like Crisco) to ensure that fondant does not stick. Make sure you cover more than necessary because I find that I always roll out more than I anticipate (and it is better to roll out a few inches more to give yourself some wiggle room). 
  2. Next, once the fondant is rolled to about a ¼ inch thickness, place your cake on a pedestal of sorts, I usually buy the big jar of Crisco, so this works nicely to set my 8-inch round cake on. 
  3. Place the fondant over your cake—this is the scary part! Gently place it, don’t just plop it down.
  4. Make sure that all sides of the cake will be covered by fondant. If not, then gently move the fondant around until it fits perfectly.
  5. As in the video, use a fondant smoother to start smoothing out the sides GENTLY! (With placing the cake on a pedestal of sorts, it is easier for the excess fondant to fall rather than having it get bunched up on the sides or lie flat on a table.
  6. Start cutting excess fondant off the side of the cake. In Wilton we use a tapered spatula rather than a pizza cutter.  
  7. Continue to smooth the fondant with the fondant smoother to ensure a nice even consistency atop the cake.
  8. Tada! You have covered your first round cake! 

Since it is a bit more tricky to cover a square cake with fondant, you can view a tutorial here: http://www.youtube.com/watch?v=N5yrYZgIXr8

Saturday, April 21, 2012

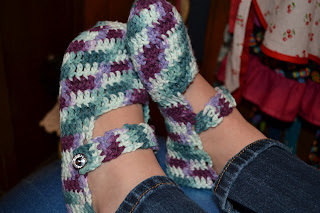
Crochet: Slippers


During winter, Inoticed how cold my feet had been while walking around the house.Since I’m not one to wear socks, (I’m a flip flop lover during all times of theyear!) my mom had been bothering me to get some slippers. I had decided tojust make them instead! I followed this very easy tutorial that I found online,but made a few adjustments.
Since the yarn I used is a bit thick, I had to cutdown the amount of rows I crocheted. I basically followed the beginning of thispattern. Then, when it says “round 5-13” I only did 6 rounds. Then I startedthe body of the slippers by following the pattern again. I made 12 rows, usinga variety of the directions outlined in Zoom Yummy’s pattern. I did 20 dc,turning after each row, for 7 rows. Then I started adding on a dc at the end ofeach row near the end (rows 8-12). After, I assembled the slipper ends bystitching up the ends like Zoom Yummy. Make sure you knot it well and make itnice and sturdy! You wouldn’t want your slippers to fall apart. Finally, Iadded a strap to my slippers (this is where my pattern differs). I found wherethe strap would look best, and just crocheted it right onto my slipper. I did arow of 4 hd crochets, for about 13 rows, skipping the middle stitch and addinganother hd on the last row (for a button hole). I sewed on cute rhinestonebuttons and finished off my slippers.
I will admit that my slippers are a bit too big,although I omitted a few rows. I feel like the cotton yarn (I used Sugar’n’Cream,since it is 100% cotton) stretched a little as I wore them, so I probably would havetaken out the last row even. 
These make great gifts, so get going in the summer while there is some time to sit and crochet!
Happy Crocheting!