Showing posts with label crochet. Show all posts

Saturday, November 10, 2012

Hello!!!

Hello my lovely Crocheted Cupcakers! Sorry for this long hiatus that I have been on. While I have not been baking so much, I have been crocheting up a storm! My friends & family will be getting some great Christmas gifts this year :)

Anyway, I hope all of you haven't lost faith in me as I will continue on with this Crocheted Cupcake venture in the future, as I have done in the past!

A few life updates: I went to England in July to meet my pen pal, Jess. It was fabulous! All of you should go to England at some point as the northern region is just beautiful. Then, for the past few months I have been busy busy with school (I'm a senior in college and will be graduating with my BA in Business Administration in the Spring 2013) and dealing with all these NJ natural disasters! Who would have thought that we would ever see gas rationing again? But anyway!

Here are some photos of my most recent crochet scarves. They include: Granny square with scallop edging, lacy, ruffle and zig-zag patterns. If you are interested in purchasing a custom scarf in one of these patterns, feel free to check out The Crocheted Cupcake Facebook page and message me! :)

Happy crocheting my lovelies! 


Thursday, June 21, 2012

Klutz Crochet Hat


Here are some directions to make a quick and easy crochet hat, thanks to Klutz! I find that the Klutz crochet and knitting books are hard to come by, but they are so helpful in teaching you a basis. This hat is so easy that I made on my way to the airport before my trip to Vietnam! And then realized I was doing something wrong and had to take it out and start over. Nonetheless, it still worked and my friend had a semi-weird shaped hat by the time we said goodbye. When I have used this pattern other times, it has come out perfect and looks great. Adorn it with some embellishments or flowers and you have yourself a super cute, stylish hat! 


Hat:
  1. Start by making a chain of 4 stitches. Join the ends by making a slip stitch in the first stitch
  2. Chain 3
  3. Make 9 double crochets right into the center of the ring while weaving the end of the yarn into the ring (so you won’t have to sew it in later).
  4. Use a stitch marker to mark the stitch that is currently on your hook (9th dc)
  5. Make 2 double crochets right into the space between the first string of chains and the first double crochet
  6. Now make 2 double crochets in the next stitch and every stitch around. Stop when you get to the stitch marker
  7. Move your marker to the loop on your hook and then repeat these stitches all the way around: *1 dc in the next stitch, 2 dc in the following stitch** There should be 30 stitches
  8. Move marker to the loop on the hook and start the 4th round. Follow this pattern: *1 dc in the next 2 stitches, 2 dc in the following stitch** There should be 40 stitches total
  9. Move marker to the loop on your hook and start the 5th round: *1 dc in next 3 stitches, 2 dc in following stitch** Total of 50 stitches
  10. Move marker to the loop on your hook and start the last round (last round of increases, yippee!): *1 dc in next 4 stitches, 2 dc in the following stitch** Total of 60 stitches
  11. Move your marker down a row so it is out of the way bit still marks the end of a round. DC in every stitch around now until you get to the right length. You can stop a ½ inch before and end the hat with a girly scallop edging.

Scalloped Edge:
  1. If you want the trim to be a different color, then add the new yarn now. Make a SC in the next stitch
  2. Skip a stitch then make 5 dc in the next one
  3. Repeat this sequence all the way around: *skip a stitch, make a sc in the next one, skip a stitch, make 5 dc in the next one**
  4. When you get to the beginning again, skip a stitch and make a slip stitch in the next one.
  5. Cut yarn and weave into hat

Tuesday, June 19, 2012

Crochet Fern Leaf


Here I have for you a scanned version of the fern leaf that accompanied my crochet daisy. It is scanned from the book because I didn't want to mess up writing the pattern for all your lovely people out there. Hope you can read it and make beautiful leaves with it!


Wednesday, May 30, 2012

Daisy Crochet Pattern


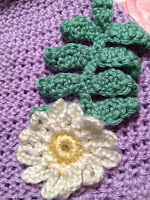
This crochet flower is out of the book “100 Flowers to Knit or Crochet” by Lesley Stanfield. At first glance, it looked as if there were so many flowers to make, but then I took a look at the patterns. My pattern reading is not up to par, so it is quite difficult for me to understand what is going on in most of the flower patterns! And forget even attempting to decipher the knit ones (although they are really beautiful)! The “Lazy Daisy” flower is my first attempt at one of these 100 or so flowers. I also made a fern leaf to go along with it (which will come next week) to help accentuate the flower. I intend to sew it onto a purple hat for wintertime. Enjoy! I hope this pattern and the images on the book cover pique your interest and you go out to purchase it to make more great flowers (and even vegetables) for your projects!

Yarn “A”: Yellow
Yarn “B”: White

Method
Center Using A, make 6ch, join with ss into a ring.
1st round (RS) 1ch, 11sc in ring, using B ss in 1ch. 12 sts.
Petals Continue with B.
2nd round [11ch, ss in next sc] 12 times, ending ss in ss of first round.
Fasten off invisibly.

Seems easy, right? Let me know how yours turns out, I’d love to see your daisy results! 

Abbreviations according to the author:
ch=chain
ss=slip stitch
sts=stitches
sc=single crochet


Thursday, May 17, 2012

Crochet: ZigZag Blanket


Well my lovely crochet friends, I know it is very satisfying when you finish a big project, like an afghan or sweater. Sadly, I am not there yet with my zigzag blanket! But I thought I’d update all of you on my progress!
It all started last winter before I left for Vietnam. My friend Stephen and I were hanging out and I happened to look up some different crochet patterns on YouTube (I’m not the best at reading patterns, so video tutorials are my favorite at the moment). We found that the classic crochet zigzag blanket really isn’t too difficult to make, so we gave it a shot! While studying abroad, I found out that my dear friend had started his zigzag blanket journey by using this video tutorial.

It is a beautiful blanket thus far, and I was so jealous! I kept saying I was going to steal the blanket once he finished. I figured that that wouldn’t be a good idea (all that work just for me to steal it, LOL!) so I decided to start my journey and make my own. I couldn’t really follow the previous tutorial from the beginning, so I found a different video tutorial that works just as well.

At first I was thinking of making the pattern to look like a sunset. But then I realized it looked a lot like my mom’s Vera Bradley “buttercup” patterned purse. Alas, I pulled the old thing out, and it was pretty much dead on! For a couple of days I couldn’t believe it, and as I worked on my blanket, the only thing I saw was Vera. Well, I hadn’t seen the blanket in a few days because of finals and the end of semester craziness, and once I started working again, I grew to love it even more—forgetting (almost!) about the Vera lookalike. I shall keep you updated on my progress, so far it is HUGE, and I am so excited!

Sunday, April 29, 2012

Crochet: Klutz Crcochet Flower


The flower that is in the Klutz Crocheting book is super easy and fun to make—it’s also really cute. The pattern is the second in the Klutz book and uses a variety of stitches. Happy crocheting!

Flower Pattern:
Chain 6 and join ends of the chain by pushing hook through the first stitch (create a circle)
Pick up the yarn and pull it through the hook to join the circle
Chain 3
Double crochet 14 into the center of the ring (not into the stitches/chains!)
Slip stitch into the chain 3 section once all DC’s are complete
Pick up yarn and pull it through the look, as before to join round
Chain 1
First half-petal: Half double crochet 1, 1 double crochet, 1 triple (treble) crochet into the next stitch
Second half-petal: In the next stitch, 1 triple crochet, 1 double crochet, 1 half double crochet (NOTE: there are 3 crochet stitches per each half petal)
Chain 1
Slip stitch into next stitch
Repeat half-petal steps around until there are 5 petals
Slip stitch into the last stitch when finished
Cut yarn and weave into flower

(Attach to a cute crochet piece, or attach a pin or bobby pin and turn it into a cute accessory!)


Saturday, April 21, 2012

Crochet: Slippers


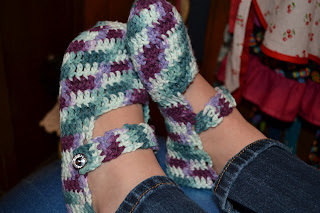
During winter, Inoticed how cold my feet had been while walking around the house.Since I’m not one to wear socks, (I’m a flip flop lover during all times of theyear!) my mom had been bothering me to get some slippers. I had decided tojust make them instead! I followed this very easy tutorial that I found online,but made a few adjustments.
Since the yarn I used is a bit thick, I had to cutdown the amount of rows I crocheted. I basically followed the beginning of thispattern. Then, when it says “round 5-13” I only did 6 rounds. Then I startedthe body of the slippers by following the pattern again. I made 12 rows, usinga variety of the directions outlined in Zoom Yummy’s pattern. I did 20 dc,turning after each row, for 7 rows. Then I started adding on a dc at the end ofeach row near the end (rows 8-12). After, I assembled the slipper ends bystitching up the ends like Zoom Yummy. Make sure you knot it well and make itnice and sturdy! You wouldn’t want your slippers to fall apart. Finally, Iadded a strap to my slippers (this is where my pattern differs). I found wherethe strap would look best, and just crocheted it right onto my slipper. I did arow of 4 hd crochets, for about 13 rows, skipping the middle stitch and addinganother hd on the last row (for a button hole). I sewed on cute rhinestonebuttons and finished off my slippers.
I will admit that my slippers are a bit too big,although I omitted a few rows. I feel like the cotton yarn (I used Sugar’n’Cream,since it is 100% cotton) stretched a little as I wore them, so I probably would havetaken out the last row even. 
These make great gifts, so get going in the summer while there is some time to sit and crochet!
Happy Crocheting! 


Wednesday, April 18, 2012

Crochet: Birthday Shawl


For my 21st birthday I had decided to make myself a shawl. I went into the city to see Chicago the Musical on Broadway and wanted to wear something special with my fancy dress. I had found this pattern a few months ago on a skein of Red Heart “With Love” yarn. I usually don’t buy Red Heart yarn, as I love Caron Simply Soft, but I could not pass up this great shawl/scarf pattern. (Except I never wore it on my birthday because it was too cold!)
            I first used the pattern to make a nice lavender scarf that didn’t take much time at all. I got a little confused with the pattern at first, but now that I have worked with it a few times, it is much easier to decipher. Red Heart gives it an “easy” grade, and once you get past the first few rows, you will be crocheting without even looking at your work!
            Since I got so many compliments on the initial lavender scarf, and since the pattern was so easy, I decided to use it to make a larger version and into a shawl. I chose black yarn since that would go with more outfits and always will look nice. I am pleased with the results and think I will receive many compliments.
You can find the pattern by Kathleen Sams on the Red Heart website here: http://www.redheart.com/free-patterns/romantic-lacy-shawl