Sunday, April 29, 2012

Crochet: Klutz Crcochet Flower


The flower that is in the Klutz Crocheting book is super easy and fun to make—it’s also really cute. The pattern is the second in the Klutz book and uses a variety of stitches. Happy crocheting!

Flower Pattern:
Chain 6 and join ends of the chain by pushing hook through the first stitch (create a circle)
Pick up the yarn and pull it through the hook to join the circle
Chain 3
Double crochet 14 into the center of the ring (not into the stitches/chains!)
Slip stitch into the chain 3 section once all DC’s are complete
Pick up yarn and pull it through the look, as before to join round
Chain 1
First half-petal: Half double crochet 1, 1 double crochet, 1 triple (treble) crochet into the next stitch
Second half-petal: In the next stitch, 1 triple crochet, 1 double crochet, 1 half double crochet (NOTE: there are 3 crochet stitches per each half petal)
Chain 1
Slip stitch into next stitch
Repeat half-petal steps around until there are 5 petals
Slip stitch into the last stitch when finished
Cut yarn and weave into flower

(Attach to a cute crochet piece, or attach a pin or bobby pin and turn it into a cute accessory!)


Thursday, April 26, 2012

Cake Decorating: How do I Cover a Cake with Fondant?


As you may know, I have wanted to be a baker for some time now. I have taken the Wilton classes and even the commercial baking class at the local community college. I strive to go to Johnson & Wales University in Rhode Island once I finish my degree at Fairleigh Dickinson University to get a degree in Baking & Pastry (I’ve already been accepted!). Recently, one of my yoga instructors had told me I should really try to start selling my cakes or get the word passed around (we all know that word of mouth advertising can be very beneficial). I took her advice and have had my first cake sale (and many since then!)! I must say that I was very pleased with the cake and how it turned out. So, since I was so pleased, I thought I would give you a few hints as to how to cover a cake with fondant (since I thought I did that pretty successfully this time).
          
This part can be the most stressful when decorating a cake because you never quite know how gravity will work and if the fondant will tear. Usually, if there is a tear or a problem area, that is where the back is or where the decorations go—it is funny how this is what is used to figure out the front and back of a cake!

             
You can find a video tutorial for covering cakes with fondant here: http://www.youtube.com/watch?v=vecmy4nKT-A
You can also read the Wilton tutorial: http://www.wilton.com/decorating/fondant/rolled-fondant.cfm

The Wilton way is slightly different than the demonstration in the video, so I will go into detail about that:
Note: Make sure that the frosting atop your cake is not fully crusted so that the fondant has something to stick to.

  1. Roll out fondant on “Fondant Fun” Wilton mat. Cover mat with vegetable shortening (like Crisco) to ensure that fondant does not stick. Make sure you cover more than necessary because I find that I always roll out more than I anticipate (and it is better to roll out a few inches more to give yourself some wiggle room). 
  2. Next, once the fondant is rolled to about a ¼ inch thickness, place your cake on a pedestal of sorts, I usually buy the big jar of Crisco, so this works nicely to set my 8-inch round cake on. 
  3. Place the fondant over your cake—this is the scary part! Gently place it, don’t just plop it down.
  4. Make sure that all sides of the cake will be covered by fondant. If not, then gently move the fondant around until it fits perfectly.
  5. As in the video, use a fondant smoother to start smoothing out the sides GENTLY! (With placing the cake on a pedestal of sorts, it is easier for the excess fondant to fall rather than having it get bunched up on the sides or lie flat on a table.
  6. Start cutting excess fondant off the side of the cake. In Wilton we use a tapered spatula rather than a pizza cutter.  
  7. Continue to smooth the fondant with the fondant smoother to ensure a nice even consistency atop the cake.
  8. Tada! You have covered your first round cake! 

Since it is a bit more tricky to cover a square cake with fondant, you can view a tutorial here: http://www.youtube.com/watch?v=N5yrYZgIXr8

Saturday, April 21, 2012

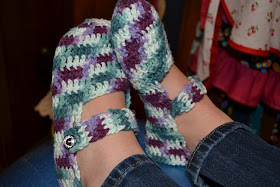
Crochet: Slippers


During winter, Inoticed how cold my feet had been while walking around the house.Since I’m not one to wear socks, (I’m a flip flop lover during all times of theyear!) my mom had been bothering me to get some slippers. I had decided tojust make them instead! I followed this very easy tutorial that I found online,but made a few adjustments.
Since the yarn I used is a bit thick, I had to cutdown the amount of rows I crocheted. I basically followed the beginning of thispattern. Then, when it says “round 5-13” I only did 6 rounds. Then I startedthe body of the slippers by following the pattern again. I made 12 rows, usinga variety of the directions outlined in Zoom Yummy’s pattern. I did 20 dc,turning after each row, for 7 rows. Then I started adding on a dc at the end ofeach row near the end (rows 8-12). After, I assembled the slipper ends bystitching up the ends like Zoom Yummy. Make sure you knot it well and make itnice and sturdy! You wouldn’t want your slippers to fall apart. Finally, Iadded a strap to my slippers (this is where my pattern differs). I found wherethe strap would look best, and just crocheted it right onto my slipper. I did arow of 4 hd crochets, for about 13 rows, skipping the middle stitch and addinganother hd on the last row (for a button hole). I sewed on cute rhinestonebuttons and finished off my slippers.
I will admit that my slippers are a bit too big,although I omitted a few rows. I feel like the cotton yarn (I used Sugar’n’Cream,since it is 100% cotton) stretched a little as I wore them, so I probably would havetaken out the last row even. 
These make great gifts, so get going in the summer while there is some time to sit and crochet!
Happy Crocheting! 


Wednesday, April 18, 2012

Crochet: Birthday Shawl


For my 21st birthday I had decided to make myself a shawl. I went into the city to see Chicago the Musical on Broadway and wanted to wear something special with my fancy dress. I had found this pattern a few months ago on a skein of Red Heart “With Love” yarn. I usually don’t buy Red Heart yarn, as I love Caron Simply Soft, but I could not pass up this great shawl/scarf pattern. (Except I never wore it on my birthday because it was too cold!)
            I first used the pattern to make a nice lavender scarf that didn’t take much time at all. I got a little confused with the pattern at first, but now that I have worked with it a few times, it is much easier to decipher. Red Heart gives it an “easy” grade, and once you get past the first few rows, you will be crocheting without even looking at your work!
            Since I got so many compliments on the initial lavender scarf, and since the pattern was so easy, I decided to use it to make a larger version and into a shawl. I chose black yarn since that would go with more outfits and always will look nice. I am pleased with the results and think I will receive many compliments.
You can find the pattern by Kathleen Sams on the Red Heart website here: http://www.redheart.com/free-patterns/romantic-lacy-shawl


Sunday, April 15, 2012

Cupcake Accessory: Message Flags

These message flags are great to add on to cupcakes that won't have writing on them. On a cake it is easy to write a message like "Happy Birthday" or "Congratulations," but sometimes cupcakes are easier to handle than cutting a cake all up. These flags get your point across and can all have the same message or different messages on them. Plus, they're super easy to make!

Supplies:
  • Paper
  • Paper Cutter (or ruler and scissors)
  • Tacky Glue
  • Q-tip
  • Toothpicks
  • Marker (or other decorative supplies)

1. First, cut out colored paper that will match or complement your cupcake colors. I cut an 8.5x11" standard sheet of paper in half, then cut 1" pieces (about) using a paper cutter.


2. Next, Fold the paper slices in half, and cut a little triangle shape on the end that is not folded (you could also just cut straight across with a pair of decorative scissors if you preferred). Then write your message or decorate the flag as you wish.


3. Using tacky glue and a q-tip, spread glue onto one side of the flag and then a little on the other side of the fold so that the toothpick will stick. Then press closed, make sure to match up the pointed ends!


4. Place finished flags under something heavy (like a baking sheet or book) to let them get flattened out and stuck together even more. Note: If using glitter glue or some other decorative supply besides a marker, skip this step! We don't want your decorations getting messed up.


Voila! You have finished your flags and they are ready to accessorize your beautiful cupcakes! For these baby shower cupcakes, I used dual colored frosting (see how in this previous blog post here), sprinkled some crystal sanding sugar, and stuck the toothpick in a charm so that guests would have a "take away" after the shower.


Wednesday, April 11, 2012

In depth review of Wilton Course 4 (continued)


Hello Cake Decorators!
This is a continued  review on the newest Wilton Course #4: Advanced Gumpaste Flowers. (See the beginning of my review here.)

I was really excited to sign up for this class at the local AC Moore, and even more excited that I would have the same teacher as I did for the other three courses, and also be in the same class as a woman I took the last two courses with (flowers & cake design and gum paste & fondant). Aside from the people, I was super excited about the course, who doesn’t love those crazy-real looking flowers on cakes? I always have loved them!

During the course we made petals for all kinds of flowers (like a lily) and some different types of leaves as well (lily leaves, ivy leaves). We also learned how to make the briar rose, along with tiny blossoms, and some other nice looking flowers.

One of my favorite parts of the course was class 3 when we learned how to color our gum paste with Wilton’s Color Dust and Food Writer markers. This made our lily petals look so real (you can see a photo of it in a previous blog post here)! I loved the outcome, and it was really easy. The color dust is something I’ve wanted to learn how to do, but have never tried (except for one horrible time when I made gum paste carnations the wrong color and had to color them—so I used the liquid coloring method, of adding vodka to the color dust and straight-up painting the finished flower shapes. It was…interesting. The gum paste got a little soft in places, but overall they ended up looking really nice, despite the vodka smell).

Being that this was the first month that the course is being offered, I feel like there are some kinks to be worked out. The kit is really nice and the products that come with it are good. It’s also good that Wilton takes into account that you have tons of stuff from the past four courses, so you can just use that stuff in place of buying new things. But, one thing is time. There seems to be a lot of time left over because we would finish making something and need it to dry, so often we just sat there or had about 45 minutes left before the course was supposed to be finished.

The other thing about this course is I feel like I haven’t actually make anything throughout the first 3 weeks. A lot of the flowers are just pieces on wire, waiting for their assembly in class 4. You don’t really have anything to show for the class besides a gerbera daisy (that is huge and not attached to a wire) and some other flowers that will later be put into a bouquet (like the briar rose and ivy, along with the blossoms). I feel like a lot of time is spent putting the floral tape around the wires, rather than focusing on the cake decorating. This is a good aspect though, I guess even though I don’t like it, because it shows us how to use different mediums with our decorating. The other thing I don’t like is we don’t decorate anything in our final class! Wilton is notorious for having students decorate a final cake in class 4. I feel like Course 4 is disjointed from the rest because we will be used lots of floral tape to assemble bouquets, not being creative in our cake decorating.

I would give the class 4.5 stars out of 5. There are some quirks and some aspects I was surprised about, but I do enjoy the course and the flowers that we learned how to make. They are beautiful, and I think in time it will be a good course. I’m just happy that there is another Wilton course beyond what has been in place for years!

Sunday, April 8, 2012

Birthday Scarves: Current & Past projects 2012


So recently I have been feeling like such an old lady. I have decided to crochet scarves for all of my friend’s upcoming birthdays. (So beware, if you befriend me, then expect a scarf for your birthday!) I feel like it has become easy enough for me to crochet a scarf in a decent amount of time. I also think that something handmade and personal makes a much better gift than store-bought and not so personal. So here’s the rundown on what I’m working on or have finished:


Krista (turning 22 on March 5): A yellow/green/brown/cream colored granny square scarf that has a scalloped edging around it. The primary color of the scarf is yellow. It’s nice and bright, but also kind of yogi/hippie-ish in its coloring. I feel this is appropriate for Krista because she was definitely born in the wrong decade! She is a 60s/70s girl at heart and would give anything to go to a Janis Joplin or The Doors concert.

Laura (turning 21 on March 10): She is also getting a similar style granny square scarf with scalloped edging, as is Krista. Laura’s is a bit dressier in its coloring and style, less fun and free-formed (if you could say that about a scarf!). The primary color of this scarf is navy blue, with coral and cream accents within each square (varying patterns of the colors). I thought these would be good colors for Laura because she just got an internship with the county’s prosecutor’s office, so she will be in a somewhat business-like environment. She also has a dress coat which is navy, so it will match perfectly!

Jess (turning 22 on April 11): Jess is my penpal from England, and I know she likes anything cute, handmade, and thoughtful. For her, I am making this lacey-type scarf that is a dark coral color. It is a single color, but the design in the scarf is pretty, fun, and elegant. I think she will really love this scarf because it isn’t your typical granny square, and it isn’t your typical crochet either.

Stephen (turning 20 on June 28): For Stephen I am making a zigzag scarf. I haven’t decided whether I want to use muted colors, that would be fabulous for fall, or if I want to go crazy and use his favorite colors which are turquoise/aqua and orange; along with accent colors like cream, brown or black. I know that either way he will love it because it will be as unique as he is. I’m looking forward to this scarf a lot because Stephen is my crochet friend, and we can talk about patterns, current projects, our want for bamboo crochet hooks, and everything else that “normal” 20-somethings wouldn’t necessarily be discussing while chatting over coffee. I’m also excited because I have never attempted to make a zigzag pattern, but he assures me it isn’t too hard since he is making a blanket using a similar pattern.

Photos to come once each project is completed! Happy Crocheting & Happy Birthdays!

Thursday, April 5, 2012

Wilton Course 4 Review


Hello Cake Decorators!

I am very excited to say that I took the Wilton Course 4 class “Advanced Gum Paste Flowers” in February! I have been looking forward to taking it since I heard about it from the local Wilton instructor last summer.  I really do love the Wilton-method classes. Although they require a lot of supplies, and you will feel like you have purchased Wilton’s entire line of products, I feel that it is definitely worth it! Especially if you want to make a career out of baking and cake decorating! 

I have also taken a commercial baking course at the local community college, and I must say, although I value the skills I learned in that class, I like the Wilton method of cake decorating much better—even for simple cake designs. I feel that although commercial kitchens may be operating very efficiently, the “Wilton way” is just as good and has a little nicer, less commercial outcome. Also, the Wilton courses are much more extravagant than a commercial baking class, focusing only on cake decoration. I have loved learning about fondant, gum paste, and how to utilize these items along with various tools to create a fabulous looking cake. I really loved learning how to make gum paste flowers in Course 3 “Gum Paste & Fondant,” but I must say that learning the gerbera daisies (my favorite flower!) in course 4 was super fun and easy! I was also interested in learning about the flowers that have multiple wire petals, and just how to  assemble them. I must say, that I was pleasantly surprised with how easy the process is—although it is annoying to figure out how exactly you are going to stick the wire stems into a cake (you have to use some sort of something as wire is not edible). So I found the “Great Value” flexible straws to be the easiest for this since they are large and will accommodate the large amounts of wire. Good luck if you take this new course at your local craft store!

See the continuation of my review here.


Tuesday, April 3, 2012

Speaking to the SCCC Business Club

Today I had the honor of speaking to the Business Club at Sussex County Community College. And it was so much fun! I loved going back to my old school and seeing professors and students that I haven't seen since last year around this time.

Some things I discussed with the group included: basics of Etsy, The Crocheted Cupcake and my goals, transferring to a 4-year institution, and my study abroad experience to Vietnam & Cambodia. I really had a great time telling everyone about these topics. I hope they enjoyed it also!

The people present really gave me a lot of ideas on how I could market myself and business more, items I could sell and ways I could sell them, along with other ideas about possible locations for a bakery after I graduate college. All in all, I would say it was a super successful visit and I loved every minute of it! Thank you Professor Donner, Miguel, and the rest of the SCCC Business Club & students who attended!

Monday, April 2, 2012

Basic Crochet Stitches


I realize that many of you may know what crocheting is, but may not know about all of the stitches! Well, I would first recommend purchasing the Klutz Crochet book as it is super easy to understand and user-friendly—that is how I learned to crochet! You can find it here on Amazon: http://www.amazon.com/Crochet-Learn-Great-Projects-Klutz/dp/1570548706
However if you don’t have some extra money lying around, I have compiled a bunch of videos and tutorials for you so you can be on your way to making fabulous crocheted items too! Hope these help!

This tutorial shows how to make a chain stitch (foundation) and a single & double crochet: http://crochet.about.com/od/learntocrochet/tp/crochet-for-beginners.htm

Half Double Stitch Video: http://www.youtube.com/watch?v=LxA2osb5Qfk